faAB's Exclusive Headings
Perfect Pleat II, Inverted Pleat and Classic Pleat
We've taken all the best features of faAB's two exclusive headings—faAB Pleat and Perfect Pleat—and blended them together to make three perfect ready-made panels. The innovative improvements make the drapery easier to use, easier to sell and much more flexible in its application.
Here's How:
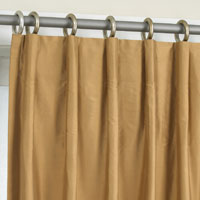
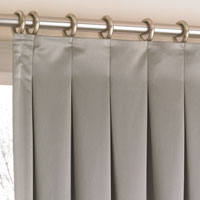
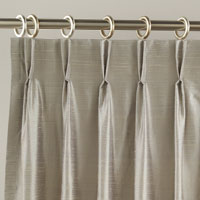
ONE: We've sewn seven fixed pleats on the back of the heading.The pleats are perfectly spaced and structured which results in a clean, contemporary look on the front of the ready-made—even when the panels are drawn closed. The Perfect Pleat II features a traditional goblet style pleat, the Inverted Pleat features a goblet pleat that is inverted and hidden on the back and the Classic Pleat features pinch style folds across the heading for a double-pleat effect.
TWO: We've made it dead easy to install. There are nine simple tabs hidden on the back of the pleat, so it works just like our bestselling faAB Pleat panel from the back. Now, this customized pleat style drapery can slip easily on to a decorative rod.
Perfect Pleat II, Inverted Pleat and Classic Pleat Work In Two Perfect Ways:
One, slips easily on to a decorative rod. Simply use the loops, sewn on the back of the drapery panel.
Or Two, change the simple ready-made with the addition of pin hooks (a package of nine, along with simple how- to instructions are provided in each drapery package). With the pin hooks in place, the drapery panel will work perfectly when installed on a decorative rod with rings (or use an I-Beam or traverse rod). For a single width panel you will require nine drapery rings. Double width panels requires 15 rings.
faAB Instructions for Installing Pin Hooks

Preparing to install the pin hooks
- Use the nine 4" (10 cm) white tabs on the back of the drapery as your guide. They are positioned evenly across the width of the panel.
- Using a ruler or the guide provided on this card, install the pin hooks at exactly the same height across the panel. This will ensure the drapery hangs evenly on the rod.

Installing pin hooks
- Push the pin hooks through the centre of the white tab, through both layers and right through the lining.
- When properly installed the pin hooks will be hidden inside the goblet pleats and will not show on the face of the drapery.
- Use the stitch line, visible at the top edge of the drapery panel, as your guide. When pins are in place, hook them onto decorative rings and slide onto a drapery rod.
- Hang and enjoy!
Deciding if you want your decorative rings to show above the drapery panel or to be hidden behind the panel.
Showing off your Decorative Rings
If you move the pin hooks closer to the top edge of the white tab, more decorative ring will show.
Note: This will lengthen the overall drop of the drapery panel on the rod. Measure carefully and install the drapery rod accordingly.
Hiding Your Decorative Rings
If you move the pin hooks lower on the white tab, less of the decorative ring will show.
Note: This will reduce the overall drop of the drapery panel on the rod. Measure carefully and install the drapery rod accordingly.
The Perfect Pleat II, Inverted Pleat and Classic Pleat work equally well using the pin hooks on a Traverse Rod or I-Beam with runners.